Introduction
Unity is well known for its Asset Store and the vast amount of resources available there. Anyone can download tools to simplify the production of their games. Many tools have custom editors for managing the data related to it. Wouldn't it be great to be able to make tools like this ourselves?
Unity offers an API for extending the editor through scripts in your project. Throughout the parts of this guide, we will learn to master this power and become a Wizard of Unity. We'll take a closer look at interacting with points in the scene using Handles, building custom interfaces for the SceneView and customizing the InspectorView to our liking.
This guide will focus on learning you the good habits and guidelines around the process of building tools for Unity and is targeted at intermediate developers. You will not see me comment on how the basics of our code works. However, you will get a (hopefully) clear introduction to how the logic behind Bézier Curves work and how we implement it as an Editor. You can also find the commented code in the project repository.
Overview
Bézier Curves are used to generate smooth curves from a given set of control points. The curves will always start with the same position as the first control point and end at the position of the last. Bézier Curves are popular in computer software as they are easy to implement, easy to use and the quality of the curves can be scaled indefinitely.
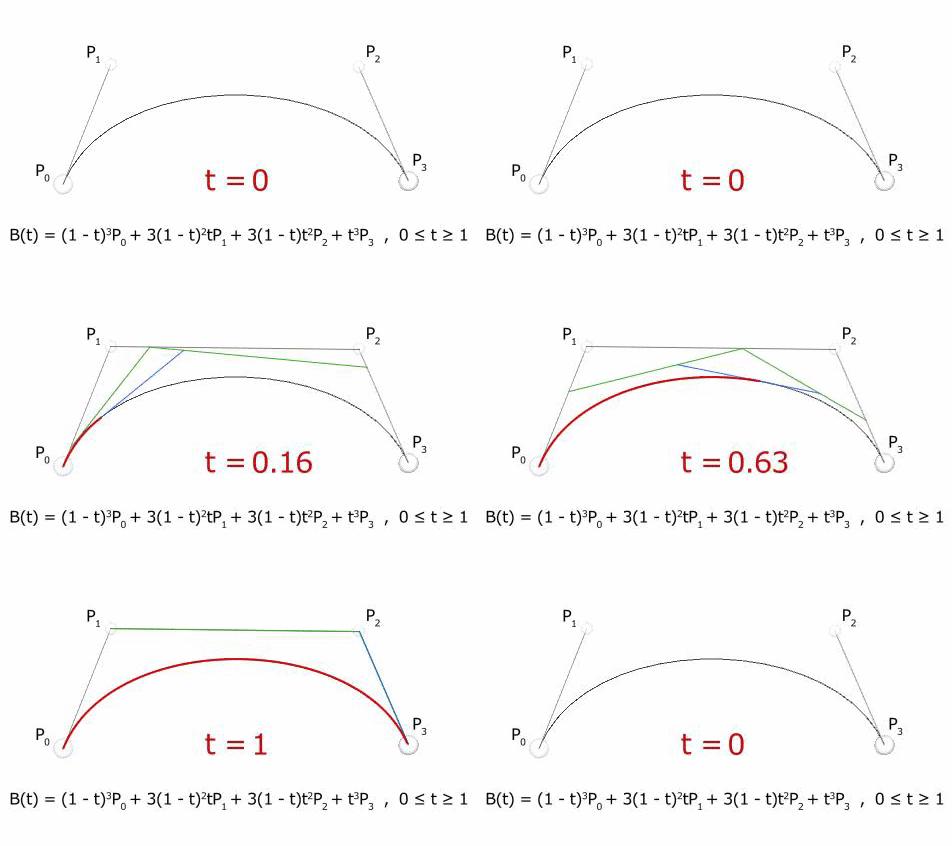
Bézier Curves are classified by its order, that is, by how many control points it uses. When working with Bézier Curves in computer software, you are most likely using Cubic Bézier Curves. These curves are of the 4th order, meaning they consists of 4 control points. The following animation illustrates how the value 't', ranging from 0.0 to 1.0, can be used to retrieve any position along the Cubic Bézier Curve. Here we have control points 0 & 3 acting as endpoints, while control points 1 & 2 acts like magnetic forces attracting the curve. The blue and green lines help visualize how the formula calculates points along the curve, however, fully understanding the math behind this formula is not necessary for implementing it with our tool.

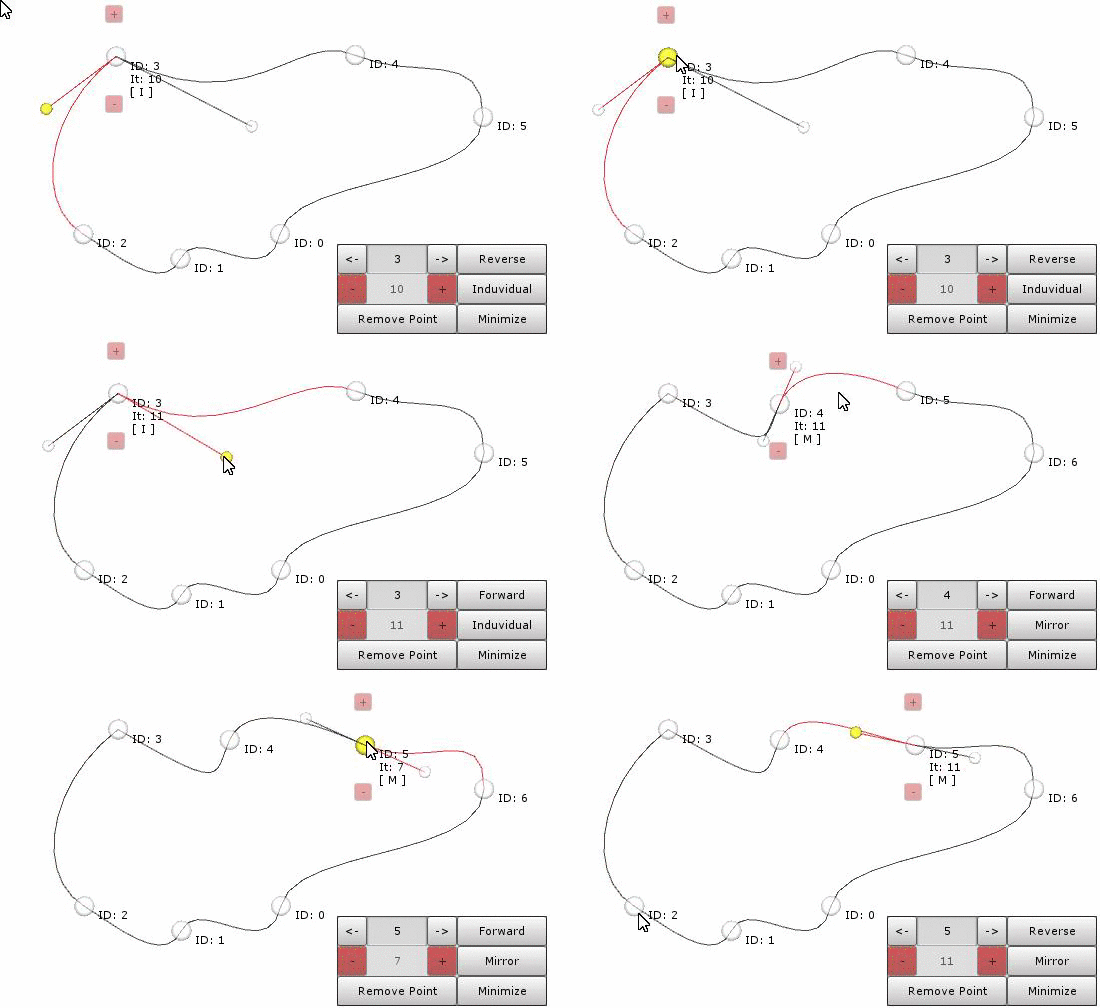
To make our BezierPath, we simply combine several Cubic Bézier Curves in a continuous sequence like demonstrated in the illustration below. Note that control points 1 & 2 (Handles) are only visible when connected to a point that is selected.

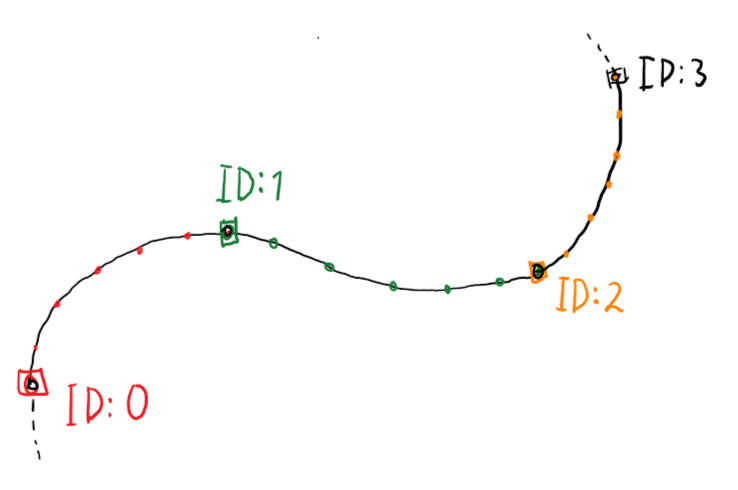
Each BezierPoint will store cached positions for the points generated between the current BezierPoint and the one indexed above it. This list of cached points will be named 'points' in the BezierPoint class and will also always contain the endpoints of the generated Cubic Bézier Curve.

When building scripts for the editor, it's important to keep performance in mind. You don't want your tools to be chewing off all the resources Unity and your system has to offer. Seeing how Bézier Curves work, it becomes obvious to us that when a point is being modified, only the connected 'parts' of the path will be affected. We will use this information to narrow down what parts of the BezierPath needs to be regenerated when. While Unity is fully capable of regenerating the whole curve every update, you never want to use more resources than what is strictly necessary.
BezierPoint
For the BezierPoint class, we are going to store all the information that has to do with each induvidual BezierPoint.
- Position of the BezierPoint.
- Position of the back and front handle, both with origin at the position of the BezierPoint.
- ArmMode, controlling the handle behaviour.
- Iterations, the number of points added between this BezierPoint and the next.
- List of cached points.
- List of lengths between cached points.
- Total length.
Let's make a new C# script "Assets\BezierPath\BezierPoint.cs" and fill it with the following code, code-discussion follows after:
using UnityEngine;
using System.Collections.Generic;

[System.Serializable]
public class BezierPoint
{
    // TODO: Make handles act according to current ArmMode in the 'set' accessors
    public Vector3 handleBack { get { return _handleBack; } set { _handleBack = value; } }
    public Vector3 handleFront { get { return _handleFront; } set { _handleFront = value; } }

    public Vector3 position;
    public List<Vector3> points = new List<Vector3>();
    public List<float> lengths = new List<float>();
    public float length = 0;
    public int iterations;
    public ArmMode armMode;

    [SerializeField]
    private Vector3 _handleBack, _handleFront;

    public BezierPoint(Vector3 pos, Vector3 _handleB, Vector3 _handleF, int iter, ArmMode armM)
    {
        position = pos;
        _handleBack = _handleB;
        _handleFront = _handleF;
        iterations = iter;
        armMode = armM;
    }
}

public enum ArmMode
{
    Mirror,
    MirrorAngle,
    Induvidual
}
The class was tagged with 'System.Serializable' so that its properties can show in the inspector if used with a Component. As noted with a 'TODO' comment, the handle-properties will be updated later on in development. A new enum was made to keep track of the BezierPoint ArmMode. The variables for holding the handle positions are private and will only be accessed using their respective properties. These variables have been tagged with 'SerializeField' so that their information will be saved between loading scenes. This would not happen automatically by default because of their accessibility (private).
BezierPath
The BezierPath class "Assets\BezierPath\BezierPath.cs" extends MonoBehaviour so that we can use it as a Component with our GameObjects. The most essential data stored in the BezierPath is the list of BezierPoints and the 'closed' variable. The latter specifies if the last BezierPoint will connect to the first one, creating a closed path. The other variables added to the class will be used later on in the guide and are self-explanatory with their names. I also implemented a mathematical Modulo method, to help contain the selected index within its bounds. I will talk more about this when implementing the 'Generate' method to the BezierPath class.
using UnityEngine;
using System.Collections.Generic;

public class BezierPath : MonoBehaviour
{
    // TODO: Add length get property, respecting closed paths

    public List<BezierPoint> bezierPoints = new List<BezierPoint>();
    public bool closed = false;
    public bool hideTransform = false, freeHandle = true, dialogOpen = true;
    public Color color = Color.black, colorSelected = Color.red;
    public float sizePosition = 0.25f, sizeHandle = 0.15f;

    private float _length = 0;

    public static int Mod(int a, int b)
    {
        return a - b * (int)Mathf.Floor(a / (float)b);
    }
}
Point Iteration

It is always important to break your software into small manageable modules. The first method we will be implementing is the Cubic Bézier Curve formula. It will take 4 control points and a value 't' between 0.0 and 1.0. The method is identical to the formula. I made the method static so that it is ready to be used for purposes other than this exact tool as well. It was added to the BezierPoint class as it is the class handling the cached points.
public static Vector3 CalculateBezier(Vector3 p0, Vector3 p1, Vector3 p2, Vector3 p3, float t)
{
    return (Mathf.Pow(1 - t, 3) * p0) + (3 * Mathf.Pow(1 - t, 2) * t * p1) + (3 * (1 - t) * t * t * p2) + (t * t * t * p3);
}
Next we are going to make the method generating all the points between two BezierPoints. We are going to add this method to the BezierPoint class as well. It will be executed from one BezierPoint and taking another as an argument. All cache for the BezierPoint executing the method will be regenerated. For each loop-cycle, we increment the value 't' and add the associated point to the cache. Lengths are calculated and stored as well. Notice how the for-loop is bound to always run at least two times. This is to always include the endpoints (where t == 0.0 or t == 1.0).
public void IterateBezierPoints(BezierPoint bezierPoint)
{
    points.Clear();
    lengths.Clear();
    length = 0;

    Vector3 point_0 = position;
    Vector3 point_1 = point_0 + handleFront;
    Vector3 point_3 = bezierPoint.position;
    Vector3 point_2 = point_3 + bezierPoint.handleBack;

    for (int iteration = 0; iteration <= iterations + 1; iteration++)
    {
        float t = iteration / (float)(iterations + 1);
        points.Add(CalculateBezier(point_0, point_1, point_2, point_3, t));
        if (iteration != 0)
        { lengths.Add(Vector3.Distance(points[iteration - 1], points[iteration])); length += lengths[lengths.Count - 1]; }
    }
}
This next piece of code will be addded to the BezierPath class. It will update the curve in front of the BezierPoint and the curve behind it (The BezierPoint indexed below). We also recalculate our length, but dont include the length of the last curve as it is the closing gap and will be included later when making the 'length' property. We use the 'Mod' method to wrap the index to keep it within the allowed indexes. Remember that this is the mathematical Modulo and therefore works differently than the (%)-operator.
public void Generate(int index)
{
    if (bezierPoints.Count > 0)
    {
        bezierPoints[index].IterateBezierPoints(bezierPoints[Mod(index + 1, bezierPoints.Count)]);
        bezierPoints[Mod(index - 1, bezierPoints.Count)].IterateBezierPoints(bezierPoints[index]);
    }

    _length = 0;
    for (int i = 0; i < bezierPoints.Count - 1; i++)
        _length += bezierPoints[i].length;
}
Nice ! Now we have our basic implementation of the BezierPath logic completed, but we still can't see anything in our SceneView. Let's do something about that!
Displaying the path
Create a new C# script "Assets\BezierPath\Editor\BezierPathEditor.cs". It was placed in a folder named 'Editor' so that Unity will treat it like an editor script. Inside the script, we include the UnityEditor to get access to the Editor API. Our class extends the Editor so that it will inherit the Editor functionalities. The class has also been tagged as a CustomEditor of the type BezierPath, meaning it will be used when a GameObject with a BezierPath Component attached is selected. A private variable 'bezierPath' was added to store the current BezierPath.
using UnityEngine;
using UnityEditor;

[CustomEditor(typeof(BezierPath))]
public class BezierPathEditor : Editor
{
    private BezierPath bezierPath;
}
Next, we're going to add a method for drawing our path. Here we are simply looping through every BezierPoint of the BezierPath and then looping through all the generated points for each BezierPoint. We draw a line from every generated point to the next using 'Handles.DrawLine'. The Handles class offers different methods for adding 3D GUI controls and drawing in the SceneView. It will be used more throughout the parts of this guide. Every point is transformed using the BezierPath Transform.
private void DrawBezierPath()
{
    for (int bezierPointNumber = 0; bezierPointNumber < bezierPath.bezierPoints.Count - (bezierPath.closed ? 0 : 1); bezierPointNumber++)
    {
        for (int iteration = 0; iteration < bezierPath.bezierPoints[bezierPointNumber].points.Count - 1; iteration++)
            Handles.DrawLine(bezierPath.transform.TransformPoint(bezierPath.bezierPoints[bezierPointNumber].points[iteration]),
                bezierPath.transform.TransformPoint(bezierPath.bezierPoints[bezierPointNumber].points[iteration + 1]));
    }
}
The last method to add for this tutorial is 'OnSceneGUI'. The method is derived from the Editor class and will be executed every time the SceneView updates. It is from this method that we will perform everything that has to do with drawing things in the SceneView. Throughout the development of our tool, we want to keep the logic in this method as simple as possible. Only the relevant main modules of our tool will be executed from here. The 'bezierPath' variable is set and cast from the 'target' variable derived from the Editor class. 'target' is the current object being inspected. A temporary for-loop has been added to generate our path every update until we develop a more effective way of doing so. Drawing the path will only happen if we have two or more BezierPoints in our BezierPath.
void OnSceneGUI()
{
    bezierPath = (BezierPath)target;

    // Remove later, don't want to regenerate full path every update
    for (int i = 0; i < bezierPath.bezierPoints.Count; i++)
        bezierPath.Generate(i);

    if (bezierPath.bezierPoints.Count > 1)
        DrawBezierPath();
}
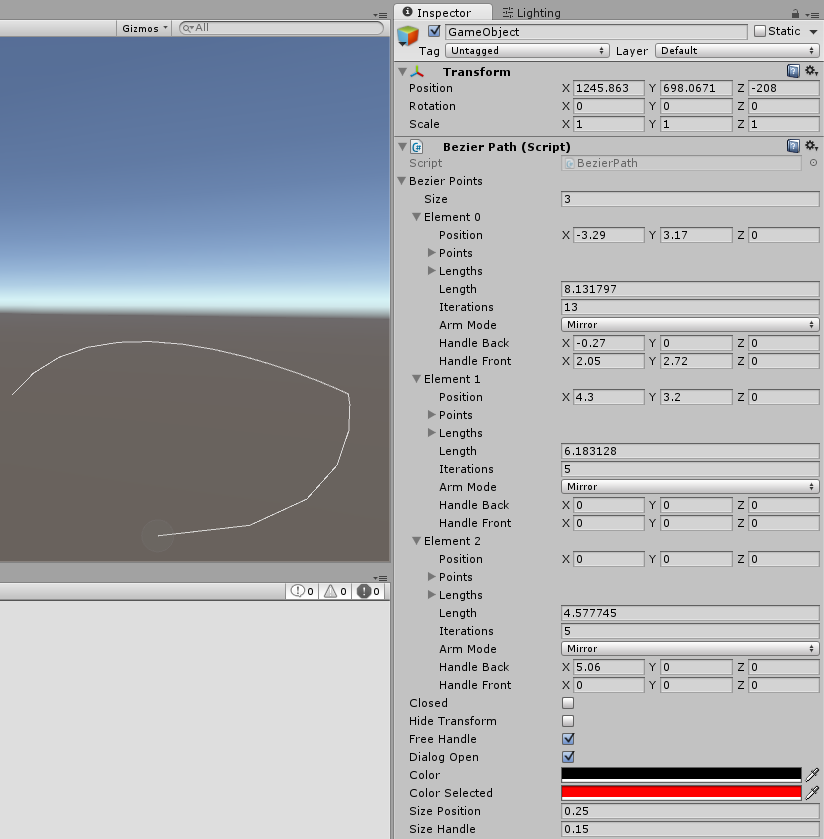
Hopefully if you now try to add the BezierPath Component to a GameObject, you will be able to fill it with some data like in the illustration below and see something similar in the SceneView! You might have to zoom in or out depending on your values and current SceneView-state.

Stay tuned!
If you like this guide and want more, be sure to follow me on twitter @TobiasKullblikk! In the next part, we are going to look at how we can use handles to modify our path intuitively from the SceneView.
When released, it will be linked to here and shared on my twitter as well.
Adieu!